
Tutorial 03
|
Tutorial 03 |
Actions |
|
Basic data and text manipulation in Excel |
|
 |
back to arithmetic |
on to algebra |
 |
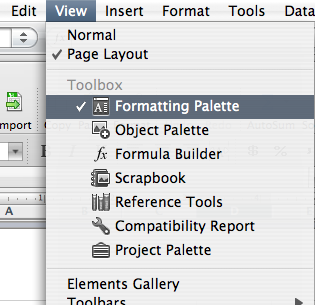
There are a few things you can do to your worksheet that makes it more readable. This will greatly help your keep track of your data and help your instructors ascertain where you are making your mistakes. These formatting tools will also be required to produce figures and tables that comply with the requirement of the Biology Department Style Manual. Here we discuss a few of the things you can do to improve the look of your worksheet. All of these basic actions can be accessed from the drop down menus from the main menu bar but you can work faster if you use tool bars to provide one click access to these functions. I recommend that you keep both the standard and the formatting tool bars open. This is accomplished from the view menu as illustrated below.

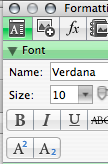
Mac users can obtain much more functionality by opening the formatting pallet instead of the toolbar.
 In this tutorial we will take you through a mock experiment where we measure
the radii of several spheres and use Excel to determine their volumes. (If only
the actual Biology labs were so easy!) The recorded radius data is shown at
the right. As you can see, the data is there but much work is required to get
worksheet into an acceptable form. You should follow the steps with your own
copy of Excel. First enter the data as shown at the right.
In this tutorial we will take you through a mock experiment where we measure
the radii of several spheres and use Excel to determine their volumes. (If only
the actual Biology labs were so easy!) The recorded radius data is shown at
the right. As you can see, the data is there but much work is required to get
worksheet into an acceptable form. You should follow the steps with your own
copy of Excel. First enter the data as shown at the right.
The data shown above has no heading. Your instructor can't possible know what the data represents and in a few days you wont know either. You first need to add column headings above the data telling the world what the numbers represent. Obviously there is no room for a heading so you must move the data to another location further down on the worksheet. You could retype the data, but why do that when you can move it?
 You can move cell contents by highlighting (selecting) the desired cells.
Then move the cursor until it turns in to hand, now click and use the mouse
to move them to an unoccupied area. For instance we move the radii data from
cells A1:A4 to A3:A6 as shown at the right.
You can move cell contents by highlighting (selecting) the desired cells.
Then move the cursor until it turns in to hand, now click and use the mouse
to move them to an unoccupied area. For instance we move the radii data from
cells A1:A4 to A3:A6 as shown at the right.
 Now we have space to add a title to our data table. Since we are determining
the volume of several spheres, let's entitle the data table "Volume of
Spheres". Put this title in cell A1. We also need column headings. In cell
A2 type "Radius" because the data below the heading are the measurements
of the radius. Let's also place a heading for the resulting volume calculations.
In cell B2, type "Volume". You are now ready to enter the formula
that you will use to calculate the volume of the spheres.
Now we have space to add a title to our data table. Since we are determining
the volume of several spheres, let's entitle the data table "Volume of
Spheres". Put this title in cell A1. We also need column headings. In cell
A2 type "Radius" because the data below the heading are the measurements
of the radius. Let's also place a heading for the resulting volume calculations.
In cell B2, type "Volume". You are now ready to enter the formula
that you will use to calculate the volume of the spheres.
 The radius and volume headings are missing the units of the data the columns
contain. Is the radius 10 cm, 10 am, 10 in? Of course, units are need. The best
way to do this is place the units in parentheses below the heading. To
keep the heading and the unit in the same cell, first type the heading and then
simultaneously press the <ALT>+<ENTER> keys. This will add a carriage
return within the cell, thus allowing you to type the unit below the heading.
The radius and volume headings are missing the units of the data the columns
contain. Is the radius 10 cm, 10 am, 10 in? Of course, units are need. The best
way to do this is place the units in parentheses below the heading. To
keep the heading and the unit in the same cell, first type the heading and then
simultaneously press the <ALT>+<ENTER> keys. This will add a carriage
return within the cell, thus allowing you to type the unit below the heading.
 Notice the units of volume is cm3 but is written as cm^3 in cell
B2. This is a common method that students use to write subscripts. But there
is a better way. Instead of typing cm^3, type cm3, then highlight the 3.
When the 3 is highlighted, click on the Format >> Cells >> Font and then
check the Superscript box under Effects and
the 3 becomes superscripted as shown to the right
Notice the units of volume is cm3 but is written as cm^3 in cell
B2. This is a common method that students use to write subscripts. But there
is a better way. Instead of typing cm^3, type cm3, then highlight the 3.
When the 3 is highlighted, click on the Format >> Cells >> Font and then
check the Superscript box under Effects and
the 3 becomes superscripted as shown to the right
Mac users simply click on the superscript button in the formatting palette.
 Copy and Paste Your Formula
 You should recall that the volume of a sphere is given by the formula ![]() ,
where r is the sphere's radius and p = 3.14159.
Therefore, the formula that you will use to find the volume of the first sphere
is =(4/3)*3.14159*A3^3. Enter this formula in cell B3. Note that the result
(4188.787 cm3) is displayed in the cell.
,
where r is the sphere's radius and p = 3.14159.
Therefore, the formula that you will use to find the volume of the first sphere
is =(4/3)*3.14159*A3^3. Enter this formula in cell B3. Note that the result
(4188.787 cm3) is displayed in the cell.
We could repeat this process for each radius in the table and type new formulas for each. However the best (and fastest) way to determine the volume of the remaining spheres is to use the copy and paste functions. It would be useful to copy the formula in cell B3 and paste it to cell B4 through B6.
| To copy the contents of a cell, highlight the cell by clicking
on the cell. In our example, click on cell B3. Then click on the Copy
Button, Double-check your formula to ensure it is correct before copying it! |
 |
| To paste the copied cells to another location, highlight the
destination cells with your mouse. In our example, we highlighted cells
B4, B5 and B6. Then click on the Paste Button, It is always a good idea to double-check the first and last cells with a calculator after a paste just to make sure the formulas were correct. I find it easier to simply substitute a test value that I already know the answer for and then undo the substitution once I know the formula is ok. |
 |
 Any good Biology laboratory student knows that 2.2 times 5.1 is 11, not 11.22
like your calculator says. This is, of course, due to the number of significant
figures used. The numbers 2.2 and 5.1 both have two significant figures,
therefore, the answer must also have two significant figures. By default Excel
displays the maximum number of decimal places. However, the number of decimals
displayed can be manually forced by using the Increase Decimal Button,
Any good Biology laboratory student knows that 2.2 times 5.1 is 11, not 11.22
like your calculator says. This is, of course, due to the number of significant
figures used. The numbers 2.2 and 5.1 both have two significant figures,
therefore, the answer must also have two significant figures. By default Excel
displays the maximum number of decimal places. However, the number of decimals
displayed can be manually forced by using the Increase Decimal Button, ![]() and Decrease Decimal Button,
and Decrease Decimal Button, ![]() ,
depending on the given situation. For example, the image at the right shows
the how to use the Decrease Decimal Button to reduce the number of decimals
in the answer. Again Mac users will find this easier to do from the formatting
pallet.
,
depending on the given situation. For example, the image at the right shows
the how to use the Decrease Decimal Button to reduce the number of decimals
in the answer. Again Mac users will find this easier to do from the formatting
pallet.
Throughout these tutorials, we will not be concerned with significant figures. I just wanted you to know how to adjust the number of decimals so your lab write-ups will be done correctly.
 It is helpful to emphasize text like titles, column headings, and final results.
One way to make text stand out is to make it bold. To make the entire
contents of a cell bold, for instance the title found in cell A1, simply highlight
(select) the cell (or cells) and click the Bold Button,
It is helpful to emphasize text like titles, column headings, and final results.
One way to make text stand out is to make it bold. To make the entire
contents of a cell bold, for instance the title found in cell A1, simply highlight
(select) the cell (or cells) and click the Bold Button, ![]() ,
on the toolbar.
,
on the toolbar.
 You need not make the entire cell contents bold as shown above. For instance,
you can make the heading bold while the units are displayed as normal text.
To do this, from the formula bar, highlight the text you wish to make
bold and then click the Bold Button,
You need not make the entire cell contents bold as shown above. For instance,
you can make the heading bold while the units are displayed as normal text.
To do this, from the formula bar, highlight the text you wish to make
bold and then click the Bold Button, ![]() ,
on the toolbar.
,
on the toolbar.
 To really draw attention to the most important results of the experiment, you
can shade or color-in the cells containing formulas and final results.
To do so highlight (select) the cell or cells you want shaded, click on the
black down-arrow of the Fill Color Button,
To really draw attention to the most important results of the experiment, you
can shade or color-in the cells containing formulas and final results.
To do so highlight (select) the cell or cells you want shaded, click on the
black down-arrow of the Fill Color Button, ![]() ,
and select the desired color.
,
and select the desired color.
Note: This would be inappropriate for a table in a formal lab report but it can make it easier for others to read your spreadsheets and faster for you to navigating your your own spreadsheets.
 We are almost done making your worksheet presentable. Currently the worksheet
looks a little cramped. Let's resize the columns so the data and results
are a little more readable. To do that, drag the boundary on the right side
of the Column A heading until the column is the width you want. Do the same
for column B. The same technique can also be used on worksheet rows.
We are almost done making your worksheet presentable. Currently the worksheet
looks a little cramped. Let's resize the columns so the data and results
are a little more readable. To do that, drag the boundary on the right side
of the Column A heading until the column is the width you want. Do the same
for column B. The same technique can also be used on worksheet rows.
 Note that if the width of a cell is too small, the cell contents
will not be able to be displayed and the ###### error will appear in the cell.
To fix the problem, simply increase the width of the cell.
Note that if the width of a cell is too small, the cell contents
will not be able to be displayed and the ###### error will appear in the cell.
To fix the problem, simply increase the width of the cell.
 You can resize a number of columns at once by selecting the columns you want
to change, and then drag a boundary to the right of a selected column heading.
Each highlighted cell will automatically become resized. The image to the right
shows the Volume Experiment columns resized to a more readable width:
You can resize a number of columns at once by selecting the columns you want
to change, and then drag a boundary to the right of a selected column heading.
Each highlighted cell will automatically become resized. The image to the right
shows the Volume Experiment columns resized to a more readable width:
![]() You can also change the font style and font size to make certain
text, like titles and headings, more noticeable.
You can also change the font style and font size to make certain
text, like titles and headings, more noticeable.
By default, all text is left-aligned in a cell. To change the alignment,
select the desired cell (or cells) and then click on one of the alignment buttons,
![]() : Align Left,
Center or Align Right.
: Align Left,
Center or Align Right.
 When including your tables in formal lab reports you can also add borders
to the cells to make them compatible with the Biology
Department Style Manual. The easiest (but not the most comprehensive) way
to add borders to a cell or cells, is to highlight the desired cells, click
on the Borders Drop down Button,
When including your tables in formal lab reports you can also add borders
to the cells to make them compatible with the Biology
Department Style Manual. The easiest (but not the most comprehensive) way
to add borders to a cell or cells, is to highlight the desired cells, click
on the Borders Drop down Button, ![]() ,
and then select the appropriate border. For more flexibility, you can create
custom borders by clicking on Format >> Cells >> Border from the Menu
Bar. Mac users simply select your required borders from the formatting pallet
,
and then select the appropriate border. For more flexibility, you can create
custom borders by clicking on Format >> Cells >> Border from the Menu
Bar. Mac users simply select your required borders from the formatting pallet
The image at the right shows the Volume Experiment data with centered headings and data. Also notice the title is resized with a different font style, and borders have been added.
 The worksheet is now in a form that is easy to read, but we can still make it
easier for your instructor to grade. For example, we can display a sample equation
from each type of formula used in the worksheet. To do this, from the formula
bar highlight the equation you wish to display as text, as shown at the
right. With the formula highlighted, click the Copy Button,
The worksheet is now in a form that is easy to read, but we can still make it
easier for your instructor to grade. For example, we can display a sample equation
from each type of formula used in the worksheet. To do this, from the formula
bar highlight the equation you wish to display as text, as shown at the
right. With the formula highlighted, click the Copy Button, ![]() ,
and then press the <ENTER> key. Don't overlook the last step, you must
hit the <ENTER> key.
,
and then press the <ENTER> key. Don't overlook the last step, you must
hit the <ENTER> key.
When the formula is copied, click in an empty cell where you want the displayed
equation to appear. In that cell, type an apostrophe ( ' ) which will
force the contents of the cell to appear as text. Then paste the formula by
clicking the Paste Button, ![]() .
.
 To
make the displayed formula even more noticeable, shade the cell with a noticeable
color as shown in the image below.
To
make the displayed formula even more noticeable, shade the cell with a noticeable
color as shown in the image below.
![]() You
may be required to print your worksheet for evaluation. It is important to print
grid lines and row and column headings so your instructor will have a reference
when checking your formulas. To do this, click on File >> Page Setup
from the Menu Bar. Then click on the Sheet tab. Make sure to select Grid
lines and Row and column headings from within the Print section.
You
may be required to print your worksheet for evaluation. It is important to print
grid lines and row and column headings so your instructor will have a reference
when checking your formulas. To do this, click on File >> Page Setup
from the Menu Bar. Then click on the Sheet tab. Make sure to select Grid
lines and Row and column headings from within the Print section.
Use the Print Preview Button, ![]() ,
to view your worksheet before you print it. Take a few minutes to review
your work and make sure that you used units, correct significant figures,
borders, shading, etc. Also make sure that you displayed your sample formulas.
When you are satisfied that it is ready to be handed in, then print it. As an
example, this is what your instructor would see if he or she were viewing our
printed Volume Experiment worksheet (note we did not use a color printer so
the shading was converted to gray-scale):
,
to view your worksheet before you print it. Take a few minutes to review
your work and make sure that you used units, correct significant figures,
borders, shading, etc. Also make sure that you displayed your sample formulas.
When you are satisfied that it is ready to be handed in, then print it. As an
example, this is what your instructor would see if he or she were viewing our
printed Volume Experiment worksheet (note we did not use a color printer so
the shading was converted to gray-scale):

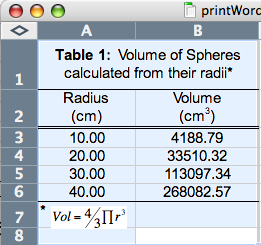 Formal
tables for inclusion in lab reports created in word processor programs like
MS Word must conform to the table styles discussed in . The
Department of Biology Style Manual as shown here. You will find that the
creation and formatting of the table are best accomplished within Excel prior
to pasting them into MS Word.Check to be certain that you have a table number,
descriptive title, column headings and appropriate gridlines (and no others)
before you proceed.
Formal
tables for inclusion in lab reports created in word processor programs like
MS Word must conform to the table styles discussed in . The
Department of Biology Style Manual as shown here. You will find that the
creation and formatting of the table are best accomplished within Excel prior
to pasting them into MS Word.Check to be certain that you have a table number,
descriptive title, column headings and appropriate gridlines (and no others)
before you proceed.
Moving your table to MSWord

Note: This is now a simple text table and changed data will not be reflected in calculations. It is possible to paste a "live" Excel table that will alow recalculations and other Excel modifications by selecting Paste special and Paste as a Microsoft Excell work sheet object but I recommend reserving that option until you have considerable experience with MSWord
|
back to arithmetic |
 |
on to algebra |
|
Copyright © 2000, St. Mary's College of Maryland. All Rights Reserved.
Please send comments, problems or request for topics to
Walter I. Hatch
wihatch@smcm.edu
August 11, 2005