|
ART 308 /
Site settings for Adobe CS Dreamweaver
1. Create your local site…
Create a
local ‘root’ folder on your
flash drive…
- Download
the web page folder www_308.zip from blackboard. Once downloaded, unzip
it by double clicking on it (you can throw away ‘www_308.zip’ one you’ve
got the www_308 folder from it).
- Plug in
your flash drive
- Create a folder on your flash drive titled ‘308’
- Drag the www_308 folder into this ‘308’ folder on
your flash drive. Note: you
can store all your classwork in your ‘308’ folder but do not put
anything but web materials in the www_308 folder!
‘Define’
your local site folder in
Dreamweaver…
- Launch Dreamweaver
- From the menu at the top, select Site and then Manage
Sites.
- In the Manage Sites window, click New Site (lower right)
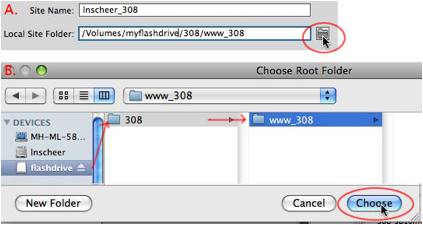
- Name the site: ‘yourusername_308’ (see A.)
- Select the ‘local site folder’: Click on the folder
icon (see A) and navigate to the www_308 folder on your flash drive, click
on it to highlighted it and then click the choose button (see B)
2. Establish your Remote site…
Fill in remote server info…
- Bring up the sites
settings dialog box: Site
> Manage Sites and Select the site by double clicking
on ‘username_308’.
- The Site Setup window will appear. Click the Servers Tab in the left menu.
- Click the +
at the bottom to add new server.
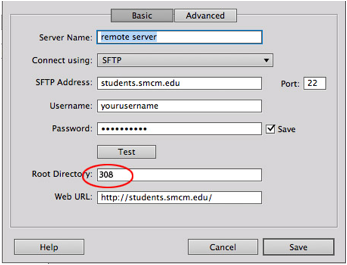
- Fill in the site setup dialog box as follows:

- Be
utterly sure all boxes are filled in exactly as shown including
punctuation, spacing and capitalization. Your user name and password
is always your current network login. If at any time you change your
password you must reedit this information in Dreamweaver.
- Test
the connection using the test button and then leave site settings
function by clicking save>save>done.
3. Create a subfolder on your Remote site…
|
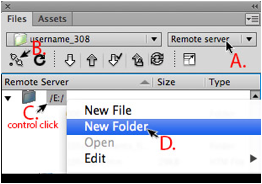
In the DW files panel (window>files)…
- Select
‘remote server’ view (A.)
- Connect
to remote server by clicking the
‘connect icon’ (B.)
- Once connected, Control Click on /E:/ (C.) and Select ‘New Folder’ from the drop
down menu. (D.)
- Rename
the
untitled folder ‘308’
- Return
to ‘local view’ from the same drop down menu A.
|
|
4. Edit your Remote Site Settings to select this new folder as the Root Directory…
- Navigate to the site
settings/remote server info dialog box the same
as before (Site > Manage Sites > select
site (double click on username_308) select Servers Tab (left menu) and double click on ‘remote server’ to open the server info box.
- Type ‘308’
in the root directory box, save and exit manage sites.
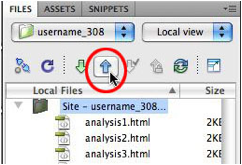
5. Upload your
local files to your remote server…
- In the
DW panels file, with the entire root folder selected (username_308),
click the upload arrow and all files for the site will upload to the
remote server.
- After
making changes to any local files, you can upload the new versions by
selecting an individual file and then clicking the upload arrow.
Remember you must also upload jpeg files.
6.
Verify
that your site is correctly organized….
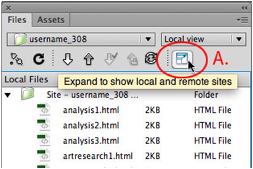
1.
Expand the file
panel to show both the local and remote views by clicking expand icon at
the top of the files panel (A.)
2.
This is what you should see…
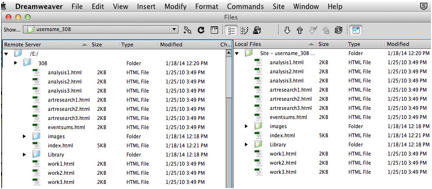
3.
Return to single file view by clicking on the same icon to
collapse panel. Note: if you have created other web pages before this they
will also show up as other folders on your remote server view.
7. Save Site Settings…
If
you come back to the same computer, plug in your flash drive and launch DW
and you are good to go. Remember, if you rename or relocate your local site
folder (www_308) you will need to redefine local settings so DW finds it.
But
every time you work on a different computer your settings must be
reestablished. To save time you can save settings and import them to other DW
applications on other computers.
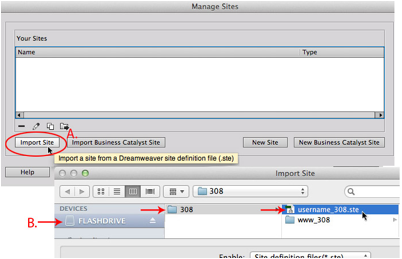
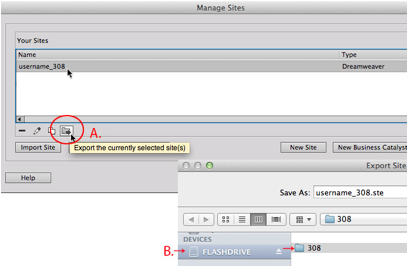
Export your
site settings…
- Bring
up the same Manage Sites
dialog box (Sites > Manage Sites)
- Select
your site and click the export button.
(see A.)
- Save
the .ste file to 308 folder on your flash drive (not the www_308 sub
folder)
Import your
site settings…
When
you are at a new computer…
- Plug in
your flash drive and launch DW.
- Go to
the manage site dialog (Sites>Manage Site) and select import site
(A.)
3.
Navigate to your .ste file on your flash drive and select
it (B.)
|